
When that specific, intense chocolate craving hits—the one that demands something fudgy yet delicately sophisticated—you need a rescue mission. Forget sad, dusty store-bought treats; we are diving headfirst into the ultimate indulgence with these perfectSweet Red Velvet Brownie Bites. Imagine sinking your teeth into a rich, velvety core surrounded by a slightly crisp, crackled top. These ruby-hued treasures are so dangerously delicious they should come with a warning label, but they are surprisingly simple to master, ensuring your next dessert emergency is handled with style and deep cocoa flavor.
- Effortless Elegance:These miniature marvels require minimal fuss, delivering maximum impact perfect for spontaneous gatherings or sudden dessert needs.
- Velvety Texture Profile:They boast an intensely fudgy interior balanced by that signature crinkly top, providing an irresistible textural experience in every small bite.
- Striking Visual Appeal:The deep, vibrant red hue instantly commands attention, making them the most visually stunning star on any dessert platter you might present.
- Adaptable Treat Size:Since they are perfectly portioned bites, they are incredibly versatile for lunch boxes, party favors, or simply enjoying one (or three) after dinner.
The Quest for the Perfect Tiny Dessert
My relationship with baking used to be defined by ambitious failures. I once tried to make a three-tiered cake using only willpower and questionable shortcuts, resulting in something structurally unsound that looked suspiciously like a leaning tower of Pisa, but in beige. The constant struggle was finding that sweet spot: a dessert that tastes utterly luxurious but doesn’t require a degree in structural engineering or 17 different steps involving obscure equipment. I needed a hero, and honestly, theSweet Red Velvet Brownie Bitesshowed up wearing a cape and smelling of cocoa.
The beauty of this recipe is its deceptive simplicity. You get all the decadent, deep chocolate flavor associated with a classic red velvet cake, but condensed into a dense, fudgy, easy-to-manage brownie format. It’s the ideal compromise for the baker who loves sophisticated flavor profiles but has a limited patience supply. We are bypassing the typical acidity struggles of traditional cake making and heading straight for rich cocoa powder depth paired perfectly with that gorgeous, vibrant color.
This recipe solved my biggest dessert dilemma: portion control. Let’s be honest, cutting a giant pan of brownies always leads to philosophical debates about what constitutes a “small slice.” By baking them in mini muffin tins, the decision is made for you. They are single-serving spheres of joy, meaning you can confidently grab four without technically eating an entire pan of dessert. This approach ensures every single bite is perfectly cooked, chewy around the edges, and moist in the middle. Plus, they look infinitely cooler stacked on a pyramid than a standard square ever could.
Achieving that Iconic Red Velvet Magic
Red velvet is more than just color; it’s a specific flavor profile resulting from the reaction between specific ingredients. Historically, the mild acidity of the cocoa powder reacts with baking soda and other leavening agents, revealing a reddish hue naturally. Nowadays, to achieve that saturated, dramatic red, we employ a little food coloring help, ensuring the bites are truly striking. However, the foundational flavor must remain deeply rooted in high-quality cocoa.
Selecting Your Cocoa Powder Wisely
For these miniature brownies, I always recommend using unsweetened natural cocoa powder, not Dutch-processed. Natural cocoa powder is slightly more acidic, which gives the finished product a sharper, more complex chocolate background necessary to balance the sweetness and fat content. This acidity also enhances the red food coloring, allowing it to truly shine. If you use standard baking chocolate instead of cocoa powder, you might compromise the dense, fudgy texture we are aiming for, leaning more toward a cakey result, which is a major party foul in the brownie world.
The Secret to Fudgy Texture
Unlike cake recipes that rely heavily on liquids and air incorporation, brownies demand structure and fat. We achieve maximum fudge factor by melting the butter and mixing it with sugar before adding the eggs. This ensures the sugar dissolves slightly, limiting gluten development and promoting that chewy, dense texture. Another critical step is careful measuring of the flour; too much flour turns these bites into dry, boring muffin tops. We want just enough flour to bind the ingredients together, keeping the focus firmly on the rich, melt-in-your-mouth chocolate base.
Ingredients for Sweet Red Velvet Brownie Bites
Here’s what you’ll need to make this delicious dish:
- Unsalted ButterUse high-quality butter, melted completely but not boiling hot, as the primary source of richness and moisture in the batter.
- Granulated SugarProvides necessary sweetness and structure; ensure it is fully mixed into the warm butter to encourage that desirable crackled crust formation.
- Large EggsAct as the crucial binder for the batter; make sure they are at room temperature to incorporate smoothly with the melted ingredients, avoiding clumping.
- Alcohol-Free Vanilla ExtractAdds a depth of flavor that complements the chocolate; pure alcohol-free vanilla extract yields the best and most aromatic result.
- Unsweetened Natural Cocoa PowderEssential for the core chocolate flavor; sift it thoroughly to prevent lumps in the final velvet mixture.
- All-Purpose FlourUsed minimally to provide just enough structure; measure this ingredient accurately by spooning and leveling to prevent overly cakey brownies.
- SaltA pinch of salt is vital for balancing the intense sweetness and amplifying the underlying chocolate notes in the dessert.
- Red Food Coloring GelFor that signature, striking red hue; use a high-quality gel coloring as liquid coloring can dilute the batter too much.
- Optional: White Chocolate Chips or Cream Cheese Frosting DrizzleUse for decoration or an extra layer of sweetness applied after the bites have cooled completely.
The full ingredients list, including measurements, is provided in the recipe card directly below.
How to Make Sweet Red Velvet Brownie Bites
Follow these simple steps to prepare this delicious dish:
Step 1: Prep and Melt
Preheat your oven to 350°F (175°C). Lightly grease a mini muffin tin, ensuring all cavities are coated to prevent sticking. In a medium, heat-safe bowl, melt the unsalted butter until fully liquid. Once melted, immediately whisk in the granulated sugar until the mixture is glossy and smooth; this step takes about one minute and helps dissolve the sugar effectively.
Step 2: Incorporate Wet Ingredients and Color
Once the sugar and butter mixture has cooled slightly (you should be able to touch the side of the bowl comfortably), whisk in the room-temperature eggs one at a time, followed by the alcohol-free vanilla extract. Now, add the red food coloring gel. Stir vigorously until the color is vibrant and evenly dispersed throughout the wet mixture, creating that characteristic bright ruby tone.
Step 3: Mix the Dry Elements
In a separate bowl, combine the sifted natural cocoa powder, all-purpose flour, and salt. Whisk these dry ingredients together thoroughly to ensure the salt and cocoa powder are evenly distributed. Gradually add the dry mixture to the wet mixture, stirring only until barely combined. The goal is to mix until no streaks of flour remain, but stop immediately to avoid over-developing the gluten, which keeps the bites fudgy.
Step 4: Bake the Bites
Spoon the thick red velvet batter into the prepared mini muffin tins. Fill each cavity about two-thirds full; they will puff up slightly during baking but remain dense. Bake for approximately 12 to 15 minutes. The edges should look set and slightly cracked, and a toothpick inserted near the center should come out with moist crumbs attached, not wet batter. Do not overbake these precious treats!
Step 5: Cool and Finish
Remove the pan from the oven and let the Sweet Red Velvet Brownie Bites cool in the pan for about 10 minutes before gently removing them to a wire rack. Cooling slightly in the pan helps them firm up and prevents breakage. Once fully cool, you can optionally drizzle them with a simple white chocolate glaze or a touch of plain cream cheese frosting for a stunning presentation.
Troubleshooting and Perfecting Your Mini Brownies
Even though this recipe is incredibly straightforward, a few common pitfalls can trip up the unsuspecting baker, resulting in less-than-perfect treats. The most frequent culprit is often temperature—both the oven temperature and the temperature of your ingredients. An oven that runs too hot will cause the bites to set too quickly and become dry, eliminating that desirable fudgy core. Investing in an inexpensive oven thermometer can save you from countless baking disappointments and guarantee consistent results every time.
Avoiding the Cakey Disaster
The difference between a chewy, fudgy brownie and a dry, cakey one often lies entirely in how you handle the flour. Overmixing the batter develops the gluten, which gives structure—great for bread, terrible for brownies. Once you add the dry ingredients in Step 3, mix using slow, deliberate strokes until the flour just disappears. You should still have a thick, luxurious batter. If you find yourself stirring for more than 30 seconds after adding the flour, you have probably gone too far, so exercise restraint!
Storage and Serving Suggestions
These ruby jewels keep exceptionally well, making them fantastic for preparing ahead of time. Store the velvet dessert treats in an airtight container at room temperature for up to four days. If you choose to top them with cream cheese frosting, however, you should refrigerate them and serve within three days. They are delightful served simply with a dusting of powdered sugar, or you can elevate them for a special occasion by serving them alongside a scoop of vanilla bean ice cream. The contrast between the cold creaminess and the dense, warm miniature brownie is pure culinary bliss.
For a fun twist on presentation, try inserting small lollipop sticks into the bottom of the cooled bites to create “brownie pops.” Dip them partially in melted white chocolate and sprinkle them with festive red sanding sugar. This transformation turns a simple snack into an elegant, handheld dessert perfect for parties, adding a playful element without sacrificing any of the rich, intense flavor you worked so hard to achieve.
These miniature desserts are proof that great things come in small packages. They offer the intense satisfaction of a full-sized brownie experience without the commitment, allowing everyone to enjoy the deep, rich flavors of chocolate and the velvety texture they crave. They are truly the easiest way to impress your friends, silence your cravings, and solidify your reputation as a dessert genius without spending all day in the kitchen.
Transfer to plates and drizzle with a cream cheese glaze for the perfect finishing touch.
The Accidental Discovery of Sunshine on a Plate

I stumbled upon the concept for theseSweet Red Velvet Brownie Bitesafter a particularly chaotic baking day, intending to make cookies but accidentally grabbing cocoa powder instead of flour. The resulting mini-brownie texture, combined with the vibrant color, transformed a disaster into an unexpected, joyful success—pure sunshine in a bite-sized treat.
Perfecting the Cooking Process
To ensure peak results, start by melting the chocolate and butter gently, letting that mixture cool slightly while you whisk the eggs and sugar vigorously. Incorporate the dry ingredients last, minimizing mixing time to guarantee that desirable chewy, fudgy interior when baking these delightful morsels.
Add Your Touch
Feel free to customize these treats by swirling in a tablespoon of orange zest for brightness or adding chopped white chocolate chunks just before baking. For a richer flavor profile, swap out standard alcohol-free vanilla extract for alcohol-free almond extract, lending a subtle, sophisticated twist to your velvet brownie bites.
Storing & Reheating
Store these decadent desserts in an airtight container at room temperature for up to four days; refrigeration can dry them out unnecessarily. If you must reheat them, a quick 10 seconds in the microwave brings back that fresh, warm gooeyness instantly, perfect for a late-night indulgence.
The Sweet Saga of the Red Velvet Brownie Bites
Every baker has that one recipe that sneaks up on them, demanding attention and adoration. For me, it was the Sweet Red Velvet Brownie Bites. They aren’t just brownies; they are miniature declarations of confectionery brilliance. Picture this: a brownie, but with the subtle tang and stunning color of a traditional red velvet cake, perfectly portioned so you can justify eating four without suffering buyer’s remorse. These are the showstoppers you bring to a dinner party when you want silent reverence, not small talk.
The Essential Ingredients for Velvet Perfection
Creating fudgy, deeply flavored mini red velvet desserts requires precision and the highest quality ingredients you can procure. Forget those boxed mixes that promise greatness but deliver dryness; we are building textural masterpieces from scratch. Remember, quality cocoa is non-negotiable here—it provides the depth that prevents these bites from tasting like glorified red food coloring.
- 1 cup (2 sticks) unsalted butter, melted
- 4 ounces unsweetened dark chocolate, chopped
- 1 ¾ cups granulated sugar
- 3 large eggs, room temperature
- 1 tablespoon alcohol-free vanilla extract
- 2 tablespoons red food coloring (or natural beet powder for color)
- 1 teaspoon white vinegar (essential for color activation and tenderness)
- 1 cup all-purpose flour
- ½ cup natural cocoa powder
- ½ teaspoon baking soda
- ½ teaspoon salt
Crafting the Luscious Cream Cheese Frosting
A true red velvet experience remains incomplete without the signature tangy cream cheese topping. This frosting is the yin to the brownie’s yang—it cuts through the sweetness and adds the necessary creamy contrast. We want it sturdy enough to pipe onto these miniature treats but smooth enough to melt deliciously on the tongue. Be sure to use full-fat ingredients here; skimpy ingredients lead to sad frosting, and nobody wants a sad topping.
- 8 ounces full-fat cream cheese, softened
- ½ cup (1 stick) unsalted butter, softened
- 4 cups powdered sugar, sifted
- 1 teaspoon alcohol-free vanilla extract
- 1-2 tablespoons milk (if needed for consistency)
Step-by-Step Guide to Baking Bliss
Baking brownies might seem straightforward, but mastering these miniature versions requires paying attention to heat and timing. Since we are using a mini-muffin tin, the baking time shrinks significantly, meaning the difference between gooey perfection and dry oblivion is only about 90 seconds. Don’t wander off to check social media during the final stretch!
Prepping the Batter for Success
Start by preheating your oven to 350°F (175°C) and lining a 24-cup mini-muffin pan with paper liners or spraying it generously with non-stick cooking spray. In a medium heatproof bowl, combine the melted butter and the chopped unsweetened chocolate. Stir until the chocolate fully melts and the mixture looks smooth and glossy. Set this aside to cool slightly while you move to the wet ingredients.
In a large mixing bowl, thoroughly whisk the granulated sugar and eggs until the mixture becomes pale and slightly thickened—this process incorporates air and is crucial for achieving that desirable light yet fudgy texture. Stir in the alcohol-free vanilla extract, red food coloring, and the white vinegar. The vinegar reacts subtly with the cocoa and baking soda, enhancing the color and contributing to the traditional red velvet taste.
Folding, Filling, and Fudginess
In a separate, smaller bowl, whisk together the flour, cocoa powder, baking soda, and salt. Gradually introduce the dry ingredients into the wet mixture, folding gently until just combined. Stop mixing the second you see no streaks of flour. Overmixing develops gluten, which results in tough, cake-like brownies, and we are aiming for maximum fudginess in these Sweet Red Velvet Brownie Bites.
Spoon the batter into the prepared mini-muffin cups, filling them about two-thirds full. The batter will be thick, almost like frosting itself. Bake for 12 to 15 minutes. The center should look mostly set, and a toothpick inserted into the center should come out with moist crumbs attached, not clean. Allow the velvet brownie treats to cool completely in the pan before attempting removal—patience is a virtue, especially when dealing with miniature baked goods.
Whipping Up the Tangy Topping
While the bites are cooling, prepare the cream cheese frosting. Using a stand mixer or hand mixer, beat the softened cream cheese and softened butter until light and fluffy. This typically takes about three minutes. Gradually add the sifted powdered sugar, alternating with the alcohol-free vanilla extract and a splash of milk if necessary, until the frosting reaches a smooth, pipeable consistency. If you accidentally add too much milk, don’t panic; just sift in a little more powdered sugar until it stiffens up.
Once the mini red velvet desserts are completely cool, transfer the frosting to a piping bag fitted with a star tip (or a simple plastic bag with the corner snipped off) and pipe a generous swirl onto the top of each bite. If you prefer a rustic look, you can just use a spoon to dollop the frosting on top. These beautiful, vibrant treats are ready to steal the show!
Mastering the Miniature Dessert Game
When you commit to baking small, you commit to precise measurements and hyper-vigilance during the oven time. The beauty of these brownie bites is their portion control, but their flaw is their tendency to dry out quickly if you push the oven temperature or time. We must treat these gems with the respect they deserve, ensuring they remain moist and chewy.
Why Vinegar and Baking Soda are Best Friends
If you’ve ever wondered why traditional red velvet recipes call for white vinegar and baking soda, it’s a brilliant piece of kitchen chemistry. The cocoa powder is naturally acidic, and the vinegar enhances this acidity. When combined with the alkali baking soda, the mixture causes a gentle lift and helps to deepen the red color saturation, resulting in that iconic rich hue we are searching for in these Sweet Red Velvet Brownie Bites. Don’t skip this step; it’s the secret to true red velvet flavor complexity, transforming a basic chocolate flavor into something much more refined.
Avoiding the Cakey Calamity
The goal is a brownie, not a miniature cupcake, which means we must minimize the air we incorporate and maximize the fat. Using melted chocolate rather than just cocoa powder helps keep the texture dense and fudgy. When folding in the dry ingredients, remember the mantra: less is more. Stir until the flour just disappears, even if a few lumps remain. Those tiny imperfections contribute to the chewiness and moisture retention of your velvet brownie treats. Additionally, using a mini-muffin tin focuses the heat more intensely, which contributes to the fudgy edges and gooey centers we all crave.
My grandmother once confessed that the first time she made these for a family gathering, she used too much flour and they came out like colorful hockey pucks. She tossed them secretly out the window and claimed the dog ate them—a true culinary cover-up. Lesson learned: measure your dry ingredients carefully, ideally using a kitchen scale for absolute precision to avoid such baking disasters.
Expert Tips for Perfect Brownie Bites
- Perfecting the Texture:Use room temperature eggs for maximum volume when whipping with the sugar; this helps create a beautiful crackle crust and a soft interior.
- Color Control:For the most vibrant results, use gel-based food coloring rather than liquid, as liquid coloring can throw off the critical wet-to-dry ratio of the batter.
- Frosting Consistency:Ensure both the butter and cream cheese are truly softened for the frosting, preventing lumps and achieving that silky smooth, pipeable texture easily.
I remember the moment my neighbor tasted these. She paused, eyes widening, and simply said, “Are these legal?” That’s the kind of reaction these miniature desserts inspire. They disappear alarmingly fast, so consider doubling the batch if you plan on serving more than three people, or if you simply cannot resist sneaking a few yourself before presentation.
Conclusion for Sweet Red Velvet Brownie Bites
These Sweet Red Velvet Brownie Bites stand out as the ideal dessert—easy to make, visually stunning, and undeniably delicious. By adhering to key steps, such as not overmixing the batter and ensuring precise baking times in the mini-muffin tins, you guarantee fudgy perfection every time. The pairing of the dense, velvety brownie with the sharp, creamy tang of the homemade frosting creates a truly balanced flavor profile. Whether you need a quick dessert for a gathering or a comforting treat for yourself, these vibrant, portion-controlled marvels promise universal adoration and are proof that sometimes, the smallest bites hold the biggest flavors. Go grab your apron; your journey to miniature dessert mastery starts now.
Print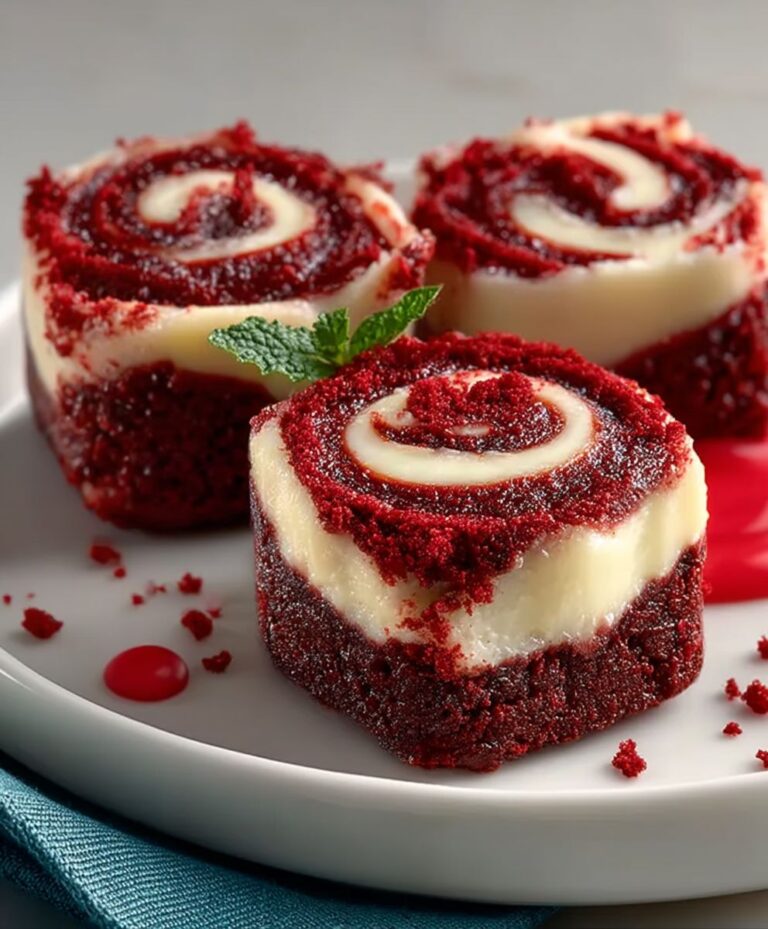
Sweet Red Velvet Brownie Bites
These decadent, fudgy Sweet Red Velvet Brownie Bites are miniature showstoppers! Achieve that perfect vibrant crimson hue using vanilla bean paste, melted butter, and sugar.
- Total Time: 35 minutes
- Yield: 4 servings 1x
Ingredients
- 1/2 cup (1 stick) unsalted butter, melted
- 1 cup granulated sugar
- 2 large eggs
- 1 teaspoon vanilla bean paste
- 3/4 cup all-purpose flour
- 2 tablespoons unsweetened cocoa powder
- 1 tablespoon liquid red food coloring (or 1–2 teaspoons gel coloring)
- 1/4 teaspoon salt
Instructions
- Step 1: Preheat the oven to 350°F (175°C). Grease a 24-cup mini muffin tin or line with mini paper liners.
- Step 2: In a medium bowl, whisk together the melted butter and granulated sugar until combined. Beat in the eggs one at a time, followed by the vanilla bean paste and red food coloring until the batter is a uniform, vibrant red.
- Step 3: In a separate small bowl, whisk together the flour, cocoa powder, and salt. Gradually add the dry ingredients to the wet ingredients, mixing only until just combined and no streaks of flour remain. Do not overmix.
- Step 4: Use a small cookie scoop or two teaspoons to distribute the batter evenly among the prepared mini muffin cups, filling each cup about two-thirds full.
- Step 5: Bake for 15 to 18 minutes, or until a toothpick inserted into the center of a brownie bite comes out with moist crumbs attached. Let the bites cool in the pan for 5 minutes before transferring them to a wire rack to cool completely.
Notes
- Store these bites in an airtight container at room temperature for up to 3 days, or refrigerate them for up to a week to maintain their fudgy texture.
- If the bites are chilled, microwave them for just 8 to 10 seconds to restore that warm, melted butter fudginess before enjoying.
- For an elegant presentation, drizzle the cooled brownie bites with a simple white chocolate or cream cheese glaze just before serving.
- Chef’s Tip: To achieve the deepest, most vibrant red color without making your batter too thin, opt for a concentrated gel food coloring rather than a liquid dye.
- Prep Time: 15 minutes
- Cook Time: 20 minutes
- Method: Stovetop
- Cuisine: American
Nutrition
- Serving Size: 2 bites
- Calories: 195
- Sodium: 110mg
- Fat: 11g
- Saturated Fat: 6.5g
- Trans Fat: 0.1g
- Protein: 18g


Leave a Comment