
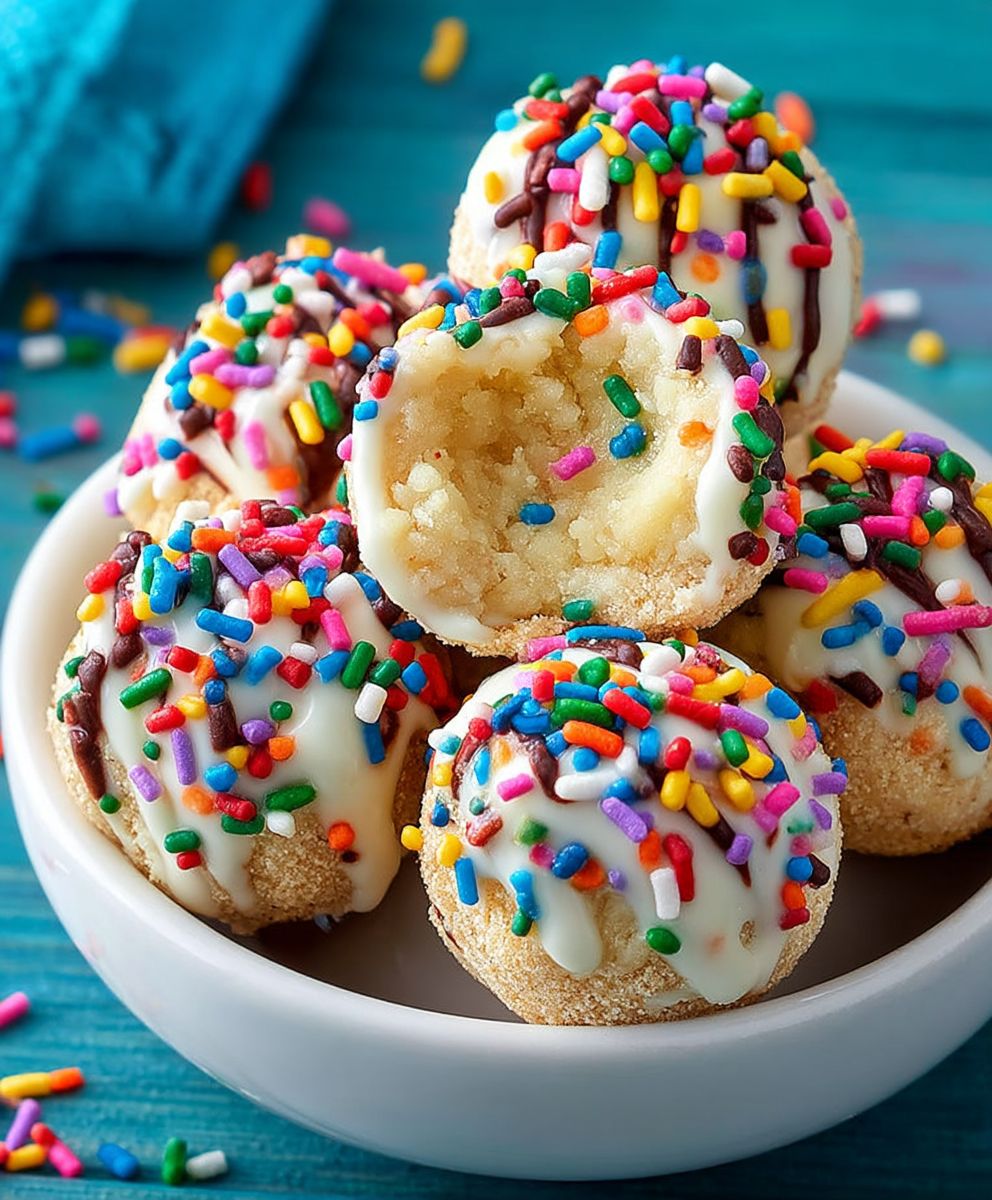
Birthday Cake Protein Balls: A Celebration in Every Bite
Birthday Cake Protein Balls are the perfect treat to satisfy your sweet tooth while keeping your health goals in check. Imagine indulging in the delightful flavors of birthday cake, complete with sprinkles and creamy frosting, all packed into a convenient, bite-sized snack. These protein balls not only bring joy to your taste buds but also offer a nutritious boost, making them an ideal post-workout snack or a guilt-free dessert.
The concept of protein balls has gained popularity in recent years, especially among fitness enthusiasts and health-conscious individuals. They are a modern twist on traditional energy bites, combining the nostalgic flavors of birthday cake with the benefits of protein. People love these Birthday Cake Protein Balls for their chewy texture, vibrant colors, and the way they effortlessly blend indulgence with nutrition. Whether you’re celebrating a special occasion or simply craving a sweet snack, these protein balls are sure to bring a smile to your face.

Ingredients:
- 1 cup rolled oats
- 1/2 cup vanilla protein powder
- 1/4 cup almond butter (or any nut butter of your choice)
- 1/4 cup honey or maple syrup
- 1/4 cup mini chocolate chips
- 1/4 cup sprinkles (for that birthday cake feel)
- 1/2 teaspoon vanilla extract
- 1/4 teaspoon salt
- 2-4 tablespoons almond milk (or any milk of your choice, as needed)
Preparing the Mixture
- Gather all your ingredients: Before you start, make sure you have everything you need on hand. This will make the process smoother and more enjoyable.
- Combine dry ingredients: In a large mixing bowl, add the rolled oats, vanilla protein powder, and salt. Stir them together until they are well mixed.
- Add wet ingredients: Next, add the almond butter, honey (or maple syrup), and vanilla extract to the dry mixture. Use a spatula or a wooden spoon to combine everything. It might be a bit tough at first, but keep mixing until it starts to come together.
- Incorporate chocolate chips and sprinkles: Once the mixture is well combined, fold in the mini chocolate chips and sprinkles. This is where the fun begins! The sprinkles will give your protein balls that festive birthday cake look.
- Adjust the consistency: If the mixture feels too dry and crumbly, add almond milk one tablespoon at a time until you reach a sticky but manageable consistency. You want the mixture to hold together when you form it into balls.
Forming the Protein Balls
- Prepare your workspace: Line a baking sheet or plate with parchment paper. This will prevent the protein balls from sticking and make cleanup easier.
- Shape the mixture: Using your hands, take a small amount of the mixture (about 1 tablespoon) and roll it into a ball. If the mixture is too sticky, you can wet your hands slightly with water or oil to make it easier to handle.
- Place on the prepared sheet: As you form each ball, place it on the lined baking sheet. Make sure to leave some space between each ball, as they may slightly expand during refrigeration.
- Repeat: Continue shaping the mixture into balls until all of it is used up. You should end up with about 12-15 protein balls, depending on the size you make them.
Chilling the Protein Balls
- Refrigerate: Once all the protein balls are formed, place the baking sheet in the refrigerator. Let them chill for at least 30 minutes. This will help them firm up and hold their shape better.
- Store properly: After chilling, you can transfer the protein balls to an airtight container. They can be stored in the refrigerator for up to a week or in the freezer for longer shelf life. Just make sure to separate layers with parchment paper if stacking them.
Enjoying Your Birthday Cake Protein Balls
- Snack time: These protein balls make for a perfect snack or post-workout treat. They are packed with protein and healthy fats, making them a great option to fuel your day.
- Share with friends: If you’re feeling generous, share these delightful treats with friends or family. They’ll love the birthday cake flavor and the fact that they’re healthy!
- Experiment with flavors: Feel free to customize your protein balls! You can add different mix-ins like nuts, dried fruit, or even swap out the almond butter for peanut butter or sunflower seed butter for a different taste.
Tips for Success
- Use quality ingredients: The flavor and texture of your protein balls will depend on the quality of the ingredients you use. Opt for natural nut butters and high-quality protein powder for
Conclusion:
If you’re looking for a delicious and nutritious snack that satisfies your sweet tooth while keeping your health goals in check, then these Birthday Cake Protein Balls are an absolute must-try! Not only do they capture the festive essence of a birthday cake, but they also pack a protein punch that makes them perfect for post-workout recovery or a midday energy boost. The combination of creamy nut butter, protein powder, and sprinkles creates a delightful treat that feels indulgent without the guilt.
When it comes to serving suggestions, these protein balls are incredibly versatile. You can enjoy them straight from the fridge for a quick snack, or you can pair them with a glass of almond milk or a smoothie for a more filling option. They also make for a fantastic addition to a party platter or a healthy dessert option at gatherings. If you’re feeling adventurous, consider rolling them in crushed nuts, coconut flakes, or even a dusting of cocoa powder for an extra layer of flavor and texture. You can also experiment with different protein powder flavors—vanilla, chocolate, or even cookie dough—to customize your Birthday Cake Protein Balls to your taste.
I encourage you to give this recipe a try and experience the joy of creating a healthy treat that doesn’t compromise on flavor. Whether you’re celebrating a special occasion or simply treating yourself, these protein balls are sure to bring a smile to your face. Plus, they’re incredibly easy to make, requiring just a few simple ingredients and minimal prep time.
Once you’ve made your own batch of Birthday Cake Protein Balls, I would love to hear about your experience! Did you stick to the original recipe, or did you add your own twist? Share your thoughts and any variations you tried in the comments below. Your feedback not only helps me improve but also inspires others in our community to get creative in the kitchen.
So, roll up your sleeves, gather your ingredients, and let’s make some delicious Birthday Cake Protein Balls together! Trust me, you won’t regret it. Enjoy every bite, and happy snacking!
Birthday Cake Protein Balls: A Delicious and Healthy Treat
These Birthday Cake Protein Balls are a delicious and nutritious snack that combines vanilla, chocolate, and sprinkles for a festive treat. Packed with protein and healthy fats, they are easy to make and perfect for on-the-go snacking or post-workout fuel. Enjoy them chilled for the best flavor!
Ingredients
- 1 cup rolled oats
- 1/2 cup vanilla protein powder
- 1/4 cup almond butter (or any nut butter of your choice)
- 1/4 cup honey or maple syrup
- 1/4 cup mini chocolate chips
- 1/4 cup sprinkles (for that birthday cake feel)
- 1/2 teaspoon vanilla extract
- 1/4 teaspoon salt
- 2-4 tablespoons almond milk (or any milk of your choice, as needed)
Instructions
- Gather all your ingredients: Before you start, make sure you have everything you need on hand. This will make the process smoother and more enjoyable.
- Combine dry ingredients: In a large mixing bowl, add the rolled oats, vanilla protein powder, and salt. Stir them together until they are well mixed.
- Add wet ingredients: Next, add the almond butter, honey (or maple syrup), and vanilla extract to the dry mixture. Use a spatula or a wooden spoon to combine everything. It might be a bit tough at first, but keep mixing until it starts to come together.
- Incorporate chocolate chips and sprinkles: Once the mixture is well combined, fold in the mini chocolate chips and sprinkles. This is where the fun begins! The sprinkles will give your protein balls that festive birthday cake look.
- Adjust the consistency: If the mixture feels too dry and crumbly, add almond milk one tablespoon at a time until you reach a sticky but manageable consistency. You want the mixture to hold together when you form it into balls.
- Prepare your workspace: Line a baking sheet or plate with parchment paper. This will prevent the protein balls from sticking and make cleanup easier.
- Shape the mixture: Using your hands, take a small amount of the mixture (about 1 tablespoon) and roll it into a ball. If the mixture is too sticky, you can wet your hands slightly with water or oil to make it easier to handle.
- Place on the prepared sheet: As you form each ball, place it on the lined baking sheet. Make sure to leave some space between each ball, as they may slightly expand during refrigeration.
- Repeat: Continue shaping the mixture into balls until all of it is used up. You should end up with about 12-15 protein balls, depending on the size you make them.
- Refrigerate: Once all the protein balls are formed, place the baking sheet in the refrigerator. Let them chill for at least 30 minutes. This will help them firm up and hold their shape better.
- Store properly: After chilling, you can transfer the protein balls to an airtight container. They can be stored in the refrigerator for up to a week or in the freezer for longer shelf life. Just make sure to separate layers with parchment paper if stacking them.
- Snack time: These protein balls make for a perfect snack or post-workout treat. They are packed with protein and healthy fats, making them a great option to fuel your day.
- Share with friends: If you’re feeling generous, share these delightful treats with friends or family. They’ll love the birthday cake flavor and the fact that they’re healthy!
- Experiment with flavors: Feel free to customize your protein balls! You can add different mix-ins like nuts, dried fruit, or even swap out the almond butter for peanut butter or sunflower seed butter for a different taste.
Notes
- Use quality ingredients for the best flavor and texture.
- Adjust the sweetness to your preference.
- Keep the protein balls chilled for optimal taste.
Leave a Comment