
We all love the idea of Italian comfort food, but sometimes the deep-fryer just glares back, demanding commitment and promising a whole lot of cleanup afterwards. Fear not, my friends! This recipe forCrispy Baked Italian Parmesan Chickendelivers all the crunch and flavor without the oil-splatter drama, guaranteeing a weeknight win that tastes anything but quick.
- Achieve a restaurant-quality crunch with minimal effort and cleanup, perfect for busy weeknights when time is tight.
- Layers of savory Italian seasoning, garlic, and rich Parmesan cheese create an unforgettable, deeply satisfying taste experience.
- The golden, cheesy crust and perfectly tender interior look stunning served over pasta or fresh greens.
- Pair this adaptable chicken with anything from simple marinara sauce to roasted vegetables or a bright lemon vinaigrette.
The Quest for the Perfect Crunch
My culinary journey, like many of yours, has been littered with the ghosts of failed attempts. There was the infamous ‘Soggy Bake of 2018,’ where I tried to shortcut breading and ended up with chicken cutlets that had the texture of sad sponges. There was also the time I got a little too enthusiastic with the garlic powder, turning dinner into a vampire deterrent. We’ve all been there—trying to achieve that perfect restaurant crispness at home, only to realize the deep fryer is a messy, aggressive beast best left to professionals.
I realized the secret wasn’t necessarily the cooking method, but the preparationbeforethe heat hits. The goal is to maximize flavor and texture adhesion while minimizing moisture. When you get this balance right, the oven transforms from a passive heating element into a powerful tool for achieving a golden, shattering crust. This method works so well, you might start asking yourself why you ever entertained the idea of frying in the first place. You are about to discover how simple weeknight magic can be when crafting this glorious oven-baked Italian dish.
Escaping the Oil Slick: Why Baking is Better
The beauty of a perfectly baked cutlet is that it provides consistent, dry heat from all sides. Unlike pan-frying, where you constantly worry about hot spots and uneven browning, baking at a high temperature, typically 400°F (200°C), blasts the breading into submission, creating a firm shell before the chicken moisture can seep out and ruin the party. Furthermore, we leverage specific breading ingredients—namely Panko—which are designed to resist moisture and create air pockets that inflate beautifully under heat, leading to superior crunch. It’s science, but delicious science that keeps your kitchen counters clean and your blood pressure low.
Preparation Secrets for Maximum Crispness
Achieving truly fantastic texture requires dedication to the breading process. Think of the breading station as a three-step spa treatment for your chicken: it must be exfoliated, moisturized, and then dusted in the finest toppings. Skipping any one of these steps guarantees a mediocre result, and nobody has time for mediocre chicken.
The Double-Dipping Technique (It’s Not Just for Chips)
The foundation of a great crust is ensuring it sticks. First, you need a good dredging flour mixture—this provides a dry surface for the liquid binder to adhere to. Second, the binder: a simple egg wash, maybe loosened slightly with a splash of milk or broth, acts as the glue. Third, the hero: Panko breadcrumbs mixed generously with finely grated Parmesan cheese and Italian herbs. The magic happens when you ensure the chicken is completely covered in the final crust mixture, pressing firmly so the crumbs truly embed themselves into the cutlet. If you don’t press, they’ll abandon ship during baking, leaving bald, sad patches of chicken behind.
To really maximize flavor, make sure your chicken cutlets are pounded thin and uniform. This guarantees they cook quickly and evenly, ensuring the inside remains juicy while the outside gets perfectly golden. Aim for about a quarter-inch thickness across the entire cutlet. If you don’t have a meat mallet, a heavy-bottomed saucepan wrapped in plastic wrap works perfectly—just remember to let out all your weekly frustrations on the chicken; it can take it.
Ingredients for Crispy Baked Italian Parmesan Chicken
Here’s what you’ll need to make this delicious dish:
- Chicken Breast CutletsUse thin-sliced cutlets or pound full breasts to a uniform ¼-inch thickness for even cooking.
- All-Purpose FlourUsed for the initial dredge, it helps dry the surface and allows the egg wash to stick efficiently.
- Eggs and Milk (or Broth)Whisked together to create the essential binder that holds the crispy coating onto the chicken.
- Panko BreadcrumbsThese are non-negotiable for maximum crunch; they absorb less moisture than traditional breadcrumbs.
- Parmesan CheeseUse fresh, finely grated Parmesan for the best flavor and melting quality in the crust mixture.
- Dried Italian SeasoningA classic blend that provides depth of flavor to the crust, complementing the garlic and cheese beautifully.
- Garlic Powder and Onion PowderEssential aromatic powders that infuse deep, savory flavor into the breading.
- Olive Oil SprayUsed to coat the breaded cutlets before baking, ensuring a rich, golden-brown, and crispy finish.
- Salt and Black PepperUsed for seasoning the chicken prior to breading, guaranteeing flavor from the inside out.
The full ingredients list, including measurements, is provided in the recipe card directly below.
How to Make Crispy Baked Italian Parmesan Chicken
Follow these simple steps to prepare this delicious dish:
Step 1: Preheat and Prep the Station
Preheat your oven to a blazing hot 400°F (200°C). Prepare a baking sheet by lining it with parchment paper or a foil layer and lightly spray it with olive oil spray. Next, set up your three-station breading assembly line: one shallow dish with seasoned flour, one shallow dish with the egg wash, and one large shallow dish containing the Panko, Parmesan cheese, and all the glorious Italian spices blended thoroughly.
Step 2: Season and Dredge the Chicken
Pat the chicken cutlets bone-dry with paper towels—this step is vital for avoiding sogginess. Season both sides of the cutlets lightly with salt and pepper. Take each cutlet and lightly coat it in the flour mixture, shaking off any excess. This ensures the cutlet is ready for its glue layer.
Step 3: Glue and Crust Application
Transfer the floured cutlet immediately to the egg wash, ensuring both sides are fully coated, letting any extra drip off. Finally, plunge the cutlet into the Panko-Parmesan mixture. Press firmly on the crumbs to ensure they stick to every square inch of the chicken. Transfer the fully coated cutlet directly to the prepared baking sheet, leaving a little space between each piece.
Step 4: Oil and Bake to Perfection
Once all the chicken is lined up, lightly mist the tops of the cutlets with olive oil spray. This small layer of oil is the crucial element that helps the Panko turn deeply golden and shatteringly crisp, mimicking the effect of shallow frying. Bake for 18 to 22 minutes, flipping the cutlets gently halfway through to ensure even browning on both sides. The chicken is done when the internal temperature reaches 165°F (74°C) and the crust is deeply golden brown.
Step 5: Rest and Serve
Remove theCrispy Baked Italian Parmesan Chickenfrom the oven and let it rest for 5 minutes. This allows the juices inside the chicken to redistribute, ensuring maximum tenderness and keeping that hard-won crispiness intact. Transfer to plates and serve immediately with your favorite sides for the perfect finishing touch.
Serving Suggestions and Pairing Perfection
One of the best qualities of this crunchy Italian chicken recipe is its magnificent versatility. It truly is the centerpiece dish that plays well with almost anything you throw its way. For a classic comfort meal, nothing beats serving the cutlets over a generous bed of spaghetti tossed in a bright, simple marinara sauce. The warmth of the sauce against the crispy crust is a textural dream.
If you are aiming for something lighter, perhaps a dish that whispers sweet nothings about summer, consider pairing it with a vibrant caprese salad—fresh mozzarella, ripe tomatoes, and basil drizzled with balsamic glaze. The acidity of the tomatoes and balsamic cuts through the richness of the Parmesan, creating a beautifully balanced meal. For a simple green side, quick-roasted asparagus or garlicky broccolini are fantastic options that add color and necessary vegetable crunch. Whatever you choose, make sure to appreciate that perfect, audible crunch when you cut into the chicken—it’s the sound of success.
Making It a Complete Meal
To round out the dinner experience, you might also want to serve a side of creamy polenta or perhaps some quick-cooking roasted root vegetables lightly tossed in herbs. If you have any remaining herbs from the breading mixture, sprinkle a pinch over your sides right before serving for flavor continuity. This dish is hearty enough for a winter gathering but light enough for a breezy summer patio dinner, proving once again that simple preparation often yields the most extraordinary results.
The Accidental Discovery of Sunshine on a Plate

I originally invented this dish on a chaotic Tuesday when I desperately needed dinner but only had crumbs and a dream. The resulting Crispy Baked Italian Parmesan Chicken wasn’t just dinner; it was the culinary equivalent of finding a twenty-dollar bill in old jeans—pure, unexpected joy. This recipe changed my weeknight routine forever.
There is a special category of weeknight recipes, reserved for those evenings when you are running on fumes, your patience is thin, and your craving for something deeply satisfying is immense. I call these recipes “Kitchen Heroes.” They are efficient, universally loved, and require minimal cleanup, yet they taste like you spent hours lovingly tending to them. This particular baked chicken dish is the undeniable captain of that hero team.
Forget the splattering oil and the greasy residue of traditional frying. We are achieving maximum crunch and golden perfection right in the oven. The secret lies in a meticulous coating process, a blend of highly seasoned breadcrumbs, and a generous layer of sharp Parmesan cheese that melts just enough to hug the chicken firmly while creating a formidable, crispy armor. Every bite of this Crispy Baked Italian Parmesan Chicken delivers a texture so satisfying it borders on therapeutic.
The Anatomy of the Perfect Crisp
The biggest roadblock to great baked breaded chicken is often moisture. If the chicken is wet, the breading steams instead of crisps, leading to a sad, soggy mess. To ensure success, we start with thin, uniform chicken cutlets, dry them aggressively, and use the classic triple-dredging technique. This is where the magic starts—setting the stage for a bake that yields a truly spectacular exterior.
Ingredients for the Ultimate Crunch
- 1.5 lbs boneless, skinless chicken breasts, sliced horizontally into four thinner cutlets
- 1 cup all-purpose flour
- 2 large eggs, lightly beaten
- 1.5 cups Panko breadcrumbs (for superior crispiness)
- 1/2 cup finely grated Parmesan cheese, plus extra for serving
- 1 teaspoon dried oregano
- 1 teaspoon dried basil
- 1 teaspoon garlic powder
- 1/2 teaspoon onion powder
- 1 teaspoon salt
- 1/2 teaspoon black pepper
- 1/4 cup olive oil or cooking spray for spritzing
The Preparation Tango: Getting the Coating Just Right
The preparation for this baked Parmesan chicken is straightforward but requires commitment to the process. First, ensure you slice the chicken breasts thinly. If they are too thick, the coating will burn before the interior cooks fully. Lay out your dredging stations: one dish with flour, one shallow bowl with the beaten eggs, and the third dish containing the Panko, Parmesan cheese, and all the dry seasonings mixed thoroughly.
The key to a clean process? Dedicate one hand to the dry ingredients (the “flour hand”) and the other to the wet (the “egg hand”). Take one cutlet, coat it thoroughly in flour, shake off the excess, dip it into the egg wash, allowing excess to drip, and finally, press it firmly into the seasoned breadcrumbs. Pressing is crucial; don’t just roll the cutlet. You want that coating to be compacted and perfectly adhered, ready to create the perfect crust in the oven. Transfer the coated chicken to a wire rack set over a baking sheet.
Perfecting the Cooking Process
For maximum efficiency, dredge and coat all the chicken first. While the oven preheats and the chicken is baking, you can easily prepare your side dishes, like simple pasta tossed with olive oil or a crisp salad, ensuring everything lands on the table simultaneously and perfectly hot.
Baking Your Way to Bliss
Preheat your oven to 400°F (200°C). Setting the cutlets on a wire rack ensures air circulates completely around the chicken, which guarantees a crisp bottom, eliminating any chance of a soggy underside. Before placing the tray in the oven, lightly spritz the top of the coated chicken cutlets generously with olive oil spray. This small but mighty step is what activates the golden browning and mimics the texture of frying without the added grease.
- Preheat the oven to 400°F (200°C). Line a large baking sheet with parchment paper and place a wire cooling rack on top.
- Arrange the coated chicken cutlets on the wire rack, ensuring they are not touching.
- Lightly spray the tops of the chicken cutlets with olive oil or cooking spray.
- Bake for 18–22 minutes, flipping halfway through, or until the internal temperature of the chicken reaches 165°F (74°C) and the crust is golden brown and supremely crunchy.
- Remove from the oven, allow them to rest for five minutes, and serve immediately with your favorite marinara dipping sauce or fresh greens.
The aroma that fills your kitchen during the last five minutes of baking is pure Italian comfort. That combination of toasted Parmesan, garlic, and basil is intoxicating. This Crispy Baked Italian Parmesan Chicken pairs beautifully with almost any side, from garlicky broccoli rabe to a quick tomato sauce served over spaghetti.
Add Your Touch
If you need a flavor twist, swap standard breadcrumbs for panko or even crushed Italian seasoned crackers. For extra zest, mix dried lemon peel into the coating blend. You can also substitute the Parmesan with sharp Pecorino Romano for a bolder, saltier bite.
You can adjust the seasoning mix based on what you love most. A pinch of crushed red pepper flakes offers a welcome warmth, while substituting the dried herbs with fresh, finely chopped parsley and chives adds a bright, herbaceous lift. For a complete meal, consider topping the baked chicken with a quick dollop of prepared marinara sauce and a final sprinkle of mozzarella during the last few minutes of baking to turn it into a fantastic, easy chicken Parm alternative.
Storing & Reheating
Store leftovers tightly sealed in the refrigerator for up to three days. To revive that legendary crispiness, avoid the microwave! Reheat the chicken on a foil-lined baking sheet in a 350°F (175°C) oven for about 10–12 minutes until heated through.
Three Expert Tips for Flawless Chicken
- Always pat the chicken completely dry before dipping it into the egg wash; excess moisture ruins the coating adhesion and prevents maximum crunch.
- After dredging the chicken in the breadcrumb mixture, firmly press the coating onto the surface to ensure it stays locked in during the baking process.
- Lightly spritz the coated chicken with olive oil spray right before baking; this crucial step simulates frying and guarantees that golden, crunchy exterior.
My niece once claimed this chicken was better than pizza—a high compliment from a ten-year-old. That night, I realized simple, crunchy comfort food always wins the family dinner debate.
Conclusion for Crispy Baked Italian Parmesan Chicken
This Crispy Baked Italian Parmesan Chicken truly proves that gourmet flavor does not require complex preparation or endless hours in the kitchen. We covered the critical steps, from ensuring dry chicken for superior coating adhesion to the best reheating methods that maintain that glorious crunch. Whether you need a lightning-fast weeknight meal or a simple dish to impress dinner guests, this baked chicken delivers every time. Go forth and conquer your dinner table with a recipe that is guaranteed to become a beloved staple in your home.
Print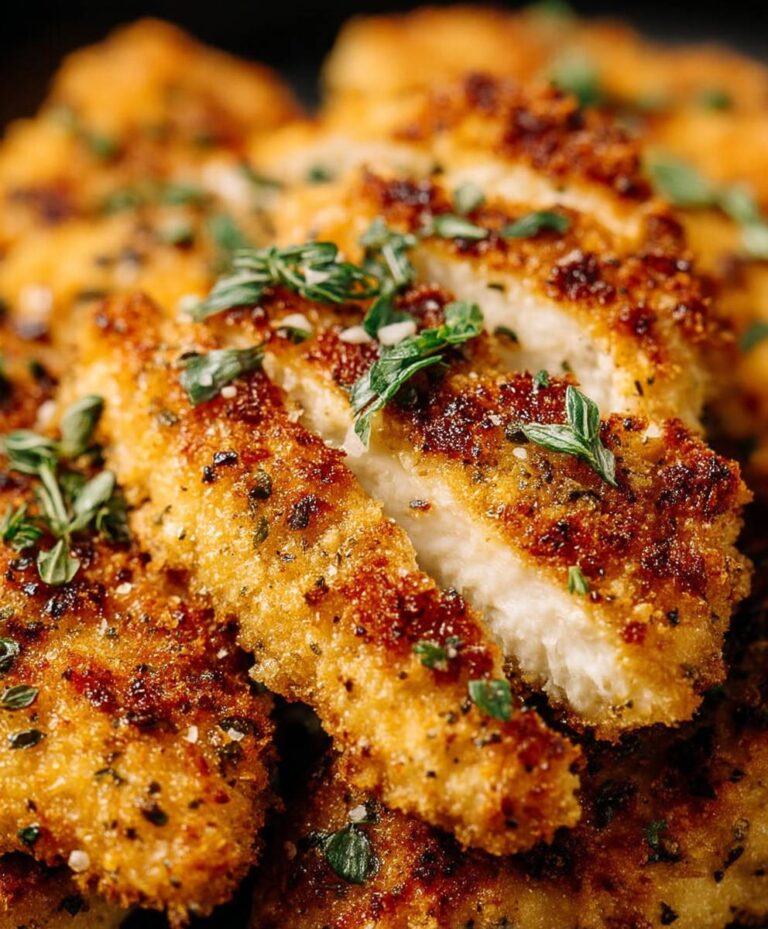
Crispy Baked Italian Parmesan Chicken
Skip the fry oil! Achieve golden, shatteringly crisp chicken using Panko, Parmesan, and 400°F baking. Includes prep tips for uniform cooking. Full nutrition & detailed instructions inside.
- Total Time: 35 minutes
- Yield: 4 servings 1x
Ingredients
- 4 boneless, skinless chicken breasts (about 1.5 lbs total)
- 1 cup Panko breadcrumbs
- 1/2 cup grated Parmesan cheese
- 2 large eggs
- 1 tablespoon Italian seasoning
- 1 teaspoon garlic powder
- 3 tablespoons olive oil (plus extra for drizzling)
- 1/2 teaspoon kosher salt
Instructions
- Step 1: Preheat the oven to 400°F (200°C). Lightly grease a large baking sheet or line it with parchment paper. If chicken breasts are very thick, lightly pound them to a uniform 1/2-inch thickness for even cooking.
- Step 2: Set up the breading stations. In a shallow bowl, whisk the eggs. In a second shallow bowl, combine the Panko breadcrumbs, Parmesan cheese, Italian seasoning, garlic powder, and kosher salt, mixing thoroughly.
- Step 3: Dredge the chicken. Dip each chicken breast first into the egg wash, ensuring it is fully coated and allowing any excess to drip off. Immediately transfer the chicken to the Panko mixture, pressing firmly on both sides until the entire piece is coated with the breading.
- Step 4: Bake the chicken. Place the coated chicken breasts onto the prepared baking sheet, ensuring they do not touch. Drizzle a small amount of olive oil (about 1/2 teaspoon) over the top of each piece. Bake for 20-25 minutes, until the internal temperature reaches 165°F (74°C).
- Step 5: Achieve maximum crispness. For a golden, extra-crispy crust, switch the oven to the broiler setting for the final 1-2 minutes, watching closely to prevent burning. Remove the chicken from the oven and let it rest for 5 minutes before serving.
Notes
- For the crispiest coating possible, firmly press the Panko mixture onto the chicken and do not skip the final drizzle of olive oil, as the fat promotes toasting and crispness.
- To restore maximum crispness, reheat the chicken in a toaster oven or standard oven at 350°F (175°C) for 10-12 minutes until heated through, avoiding the microwave which softens the crust.
- Store leftover cooled chicken in an airtight container in the refrigerator for up to 3 days, separating pieces with parchment paper if stacking to preserve the crust.
- Serve this flavorful chicken over a bed of lemon-dressed arugula or alongside garlic butter noodles to balance the rich, crispy parmesan coating.
- Prep Time: 15 minutes
- Cook Time: 20 minutes
- Method: Stovetop
- Cuisine: American
Nutrition
- Serving Size: 1 prepared chicken breast cutlet (approx. 4 oz/115g)
- Calories: 330
- Sodium: 550mg
- Fat: 10g
- Saturated Fat: 3.5g
- Trans Fat: 0g
- Protein: 2g


Leave a Comment